The Problem
Maintaining order when making custom WordPress themes can be difficult. Balancing generic classes to be used across multiple pages with specific classes for singular page templates can be difficult. Knowing when to override what class, and how to best implement the css can also be a challenge. Luckily, we have BEMIT to handle this.
The Solution – BEMIT
BEMIT is the combination of two different approaches to handling CSS in large projects. BEM is short for Block Element Modifier, and is a naming scheme. IT is short for Inverted Triangle, and is a description of the styling hierarchy.
BEM
Using the BEM naming scheme is relatively simple, as it breaks your css into three categories: blocks, elements, and modifiers.
Blocks
Blocks represent the standalone items that will make up your website. Blocks do not rely on any other items, and are generally the most abstracted items on your website.
.menu { }

.article { }

.footer { }

.header { }
Elements
Elements are parts of blocks that have no meaning when placed by themselves. If a human were a block, the feet and the hands would be the “elements.” Elements always have a leading block class name followed by a double underscore as shown below.
.article__title { }

.article__paragraph { }

.article__image { }
Modifiers
Modifiers are addon classes that are used to modify the default appearance of blocks and elements. Modifier class names are made up of the block or element they modify, followed by two dashes.
.menu--blue { }

.article__title--big { }

.article__image--bordered { }
ITCSS – Putting the IT in BEMIT
The IT in BEMIT is short for Inverted Triangle and is a methodology for organizing your CSS. It takes advantage of the hierarchy system in CSS to prevent generic styling from overriding specific stylings. At the top of the triangle are generic tools or CSS resets, and at the bottom of the triangle are very specific utility classes that override everything above them.
ITCSS can be very detailed, and there is a much more in-depth guide that covers the methodology available here.
Combining BEM and ITCSS
Combining BEM and ITCSS gives us a simple, straightforward system. Our section is broken into different pages, with different blocks. Some blocks are reusable, and are placed into the components folder of our ITCSS setup. Other blocks that are only for specific pages, are placed inside the pages folder, making it easy to recognize that they are not to be re-used throughout the site.
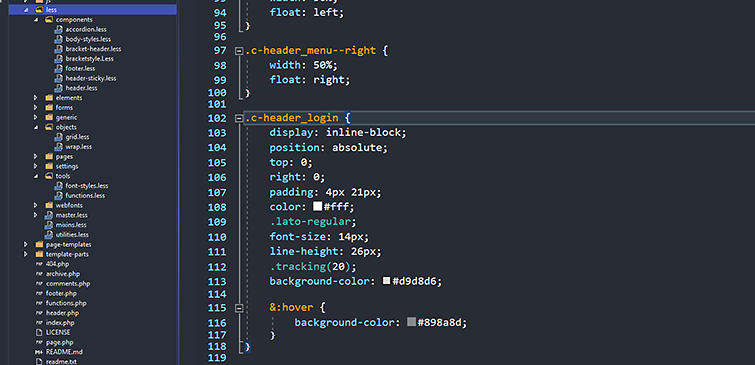
Some segments from a LESS file that utilize BEMIT structure.
.c-header_menu {
    padding-top: 43px;
    text-align: center;
}

.c-header_menu--left {
    width: 50%;
    float: left;
}

.c-header_menu--right {
    width: 50%;
    float: right;
}
Implementation
Implementing BEMIT in WordPress can oftentimes be difficult, as there is the struggle of figuring out how to organize your hierarchy. Luckily, we have taken a simple approach to this, which involves a bit of a change in the ITCSS setup.
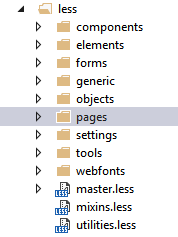
Generally, the projects that BEMIT works best on are large-scale enterprise software solutions. When it comes to a WordPress site, there are so many one-off pages that using a generalized solution doesn’t feel like a good fit. So we decided to implement a small change to the ITCSS system that best fits the WordPress custom theme workflow: we add a new level to the hierarchy: pages. In our page LESS files, we put everything that doesn’t fit neatly into the BEMIT structure. Generally speaking, we end up with a folder structure that looks something like the figure shown to the left. By mixing in this new addition to BEM, we are given a more flexible system that lets us make edits more quickly.
In putting it all together, we build one master.less file that has all of our files imported in the best order for our hierarchy. By using only one file, it makes our WordPress theme not only cleaner, but easier to manage. Only one import has to be handled in the functions.php file, and only one file has to be cache busted and minified. Not just this, but working in teams is a breeze, because no longer do you have to pass back and forth one css file with all your changes. Each team member can work on a different less file at a different step in the hierarchy, without any worries of accidentally erasing or overwriting someone else’s code.
Shown below is an actual LESS file from a previous project. Notice how cleanly the files are named, and how easy it is to see the role of each file in the project.
/*Settings*/
@import "settings/fonts.less";

/*Tools*/
@import "tools/font-styles.less";
@import "tools/functions.less";

/*Generic*/
@import "generic/reset.less";
@import "generic/fontawesome.min.css";
@import "generic/base.less";
@import "generic/fancybox.min.css";

/*Elements*/
@import "elements/html-body.less";
@import "elements/a.less";
@import "elements/img.less";
@import "elements/em.less";

/*Objects*/
@import "objects/wrap.less";
@import "objects/grid.less";

/*Components*/
@import "components/header.less";
@import "components/footer.less";
@import "components/bracketstyle.less";
@import "components/bracket-header.less";
@import "components/accordion.less";
@import "components/body-styles.less";
@import "components/header-sticky.less";

/*Forms*/
@import "forms/contact-us-form.less";

/*Pages*/
@import "pages/home.less";
@import "pages/who-we-are.less";
@import "pages/our-team.less";
@import "pages/claims.less";
@import "pages/policy-faq.less";
@import "pages/resources.less";
@import "pages/contact-us.less";
@import "pages/single.less";
@import "pages/offerings.less";
@import "pages/cyber-toolbox.less";
@import "pages/testimonials.less";
@import "pages/404.less";

/*Utilities*/
@import "utilities.less";